Phoenix Controller 직접 추가하기

Elixir Phoenix를 접한 이후 지금까지 여러가지 가이드 문서와 튜토리얼들을 탐독하고, phx.gen.html, phx.gen.context와 같은 generator들을 활용하여 phoenix 기반의 REST API server나 웹 어플리케이션 제작 방식에 익숙해지기 위해 노력해왔었다.
그러던 중 우연히 Elixir 개발 관련 개발 철학이나 best practice에 대한 뉴비의 질문에 대한 대답 중 하나가 내 생각을 바꿨다.
There are 2 approaches I now adopt, sometimes I will do them concurrently when I am bored with one of them.
The first approach is start with the UI. Do some sketches of your UI. If you feel like it, use some UI tools (figma is my personal favourite) for higher fidelity mockups. ...
(같은 답변자의 다른 답변) For the first approach, I will type out the mock data inside the controller. Only when I am pretty sure of how the data model is going to look like, then I will start writing the code for the contexts for CRUD purposes. This is where generators come into place.
요약하자면 답변자는 2가지 방식 중 하나를 택일해서 하는데 그 중 하나는 UI 스케치로 파고 들어가는 것이며, elixir 코딩에서는 우선 controller 안에 data mockup까지 다 집어넣고 (빠르게) 반복해서 수정하며 완성해나간다. 어느 정도 모양이 만들어지면 generator를 활용해서 context를 집어넣는다는 것이다.
이것이 제일 좋은 방법이라는 얘기는 아니다. 하지만 나 자신은 여러가지 generator로 만들어진 코드가 어떻게 프로그램의 다른 부분에 영향을 주고 받고, 어떤 차이가 있는지 잘 이해가 되지 않는 상태이다. 오히려 수작업으로 controller와 관련 코드를 작성해가면 내가 작성한 코드가 어떻게 동작하는지 빠르고 쉽게 눈으로 확인할 수 있고, 프레임워크 내부가 어떻게 동작하는지 파악할 수 있지 않을까 하는 생각이 들었다.
그래서 최근 진행하려는 toy project를 프로젝트 생성부터 다시 진행해봤다. 아예 database backend 없이 mocking data로 시작하기 위해 처음부터 Ecto 없이 생성하기로 하고, 나중에 필요해질 때 추가하기로 했다 (그런데 Ecto는 분량이 만만치 않을 것 같아 불안하긴 하다;;;).
mix phx.new hello --no-ecto --no-gettext --no-mailer
프로젝트 디렉토리로 들어간 다음, lib/hello_web/controllers/ 밑에 product_controller.ex 파일을 만들고 다은과 같이 뼈대에 해당하는 코드를 작성한다. 진행하면서 함수들에 내용을 채워갈텐데, 이 블로그 포스트에서는 index/2만 작성해보기로 한다.
defmodule HelloWeb.ProductController do
  use HelloWeb, :controller

  def index(_conn, _params) do
  end

  def new(_conn, _params) do
  end

  def create(_conn, %{"product" => _product_params}) do
  end

  def show(_conn, %{"id" => _id}) do
  end

  def edit(_conn, %{"id" => _id}) do
  end

  def update(_conn, %{"id" => _id, "product" => _product_params}) do
  end

  def delete(_conn, %{"id" => _id}) do
  end
end
다음으로는 lib/hello_web/controllers/product_html.ex 파일을 만든다. product_html/ 하위 디렉토리에 있는 모든 .heex 파일을 임베딩하라는 내용이다.
defmodule HelloWeb.ProductHTML do
  use HelloWeb, :html

  embed_templates "product_html/*"
end
lib/hello_web/controllers/product_html/ 디렉토리를 만들고 여기에 .heex 파일들을 만든다. 여기에 controller의 index/2에 해당하는 index.html.heex 파일을 작성한다. 컬럼은 우선 title만 넣었다. 나중에 Product의 데이터 스키마에 맞춰 컬럼을 더 추가할 것이다.
<.header>
  Products
  <:actions>
    <.button>New</.button>
  </:actions>
</.header>

<.table id="products" rows={@products}>
  <:col :let={product} label="Title"><%= product.title %></:col>
  <:action :let={product}>
    <div class="sr-only">
      <.link navigate={~p"/products/#{product}"}>Show</.link>
    </div>
    <.link navigate={~p"/products/#{product}/edit"}>Edit</.link>
  </:action>
  <:action :let={product}>
    <.link href={~p"/products/#{product}"} method="delete" data-confirm="Are you sure?">
      Delete
    </.link>
  </:action>
</.table>
다음으로 lib/hello_web/router.ex을 편집하여 /products/... url을 product controller로 연결하자.
     get "/", PageController, :home
+    resources "/products", ProductController, only: [:index]
마지막으로 처음 추가했던 product_controller.ex 파일을 다시 열어서, router에서의 index/2 호출에 product_html/index.html.heex가 처리될 수 있도록 코드를 추가한다.
-  def index(_conn, _params) do
+  def index(conn, _params) do
+    render(conn, :index, products: [])
   end
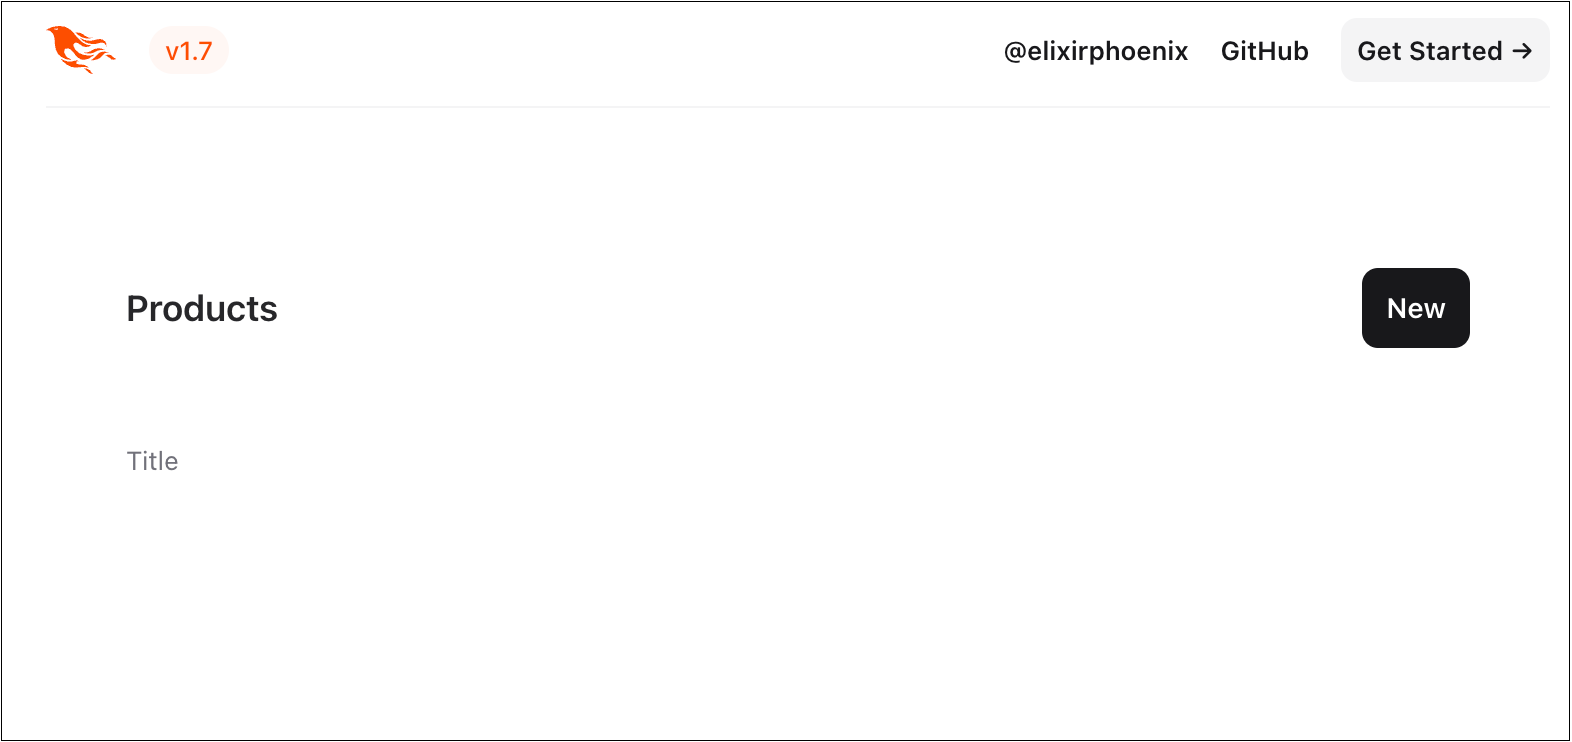
그 후 mix phx.server 실행한 다음 브라우저에서 http://localhost:4000/products로 접속하면 다음 화면을 볼 수 있다. 데이터도 없고, 컬럼도 Title 하나만 작성한 상태이므로 최소한의 구성으로만 나왔다.
이제 여기에 데이터를 추가해보자. ProductController의 index/2 함수에서 render/3 호출에 map 형식의 데이터를 하나 추가해보자. 프레임워크 구조 상 id는 꼭 필요한 필드이기 때문에 함께 추가한다.
   def index(conn, _params) do
-    render(conn, :index, products: [])
+    render(conn, :index, products: [%{id: 1, title: "hello"}])
   end
그러나 브라우저에서 화면 재로딩을 해보면, 'hello'가 추가된 화면 대신 maps cannot be converted to_param. A struct was expected, got: %{id: 1, title: "hello"} 에러 메시지를 뱉어낸다. defstruct로 정의된 구조체를 원하는 것이다. product_controller.ex 파일 제일 앞에 다음과 같이 Product라는 구조체를 추가한다.
defmodule Product do
  defstruct [:id, :title]
end

defmodule HelloWeb.ProductController do
  ...
index/2 함수도 이에 맞춰 수정한다.
   def index(conn, _params) do
-    render(conn, :index, products: [%{id: 1, title: "hello"}])
+    render(conn, :index, products: [%Product{id: 1, title: "hello"}])
   end
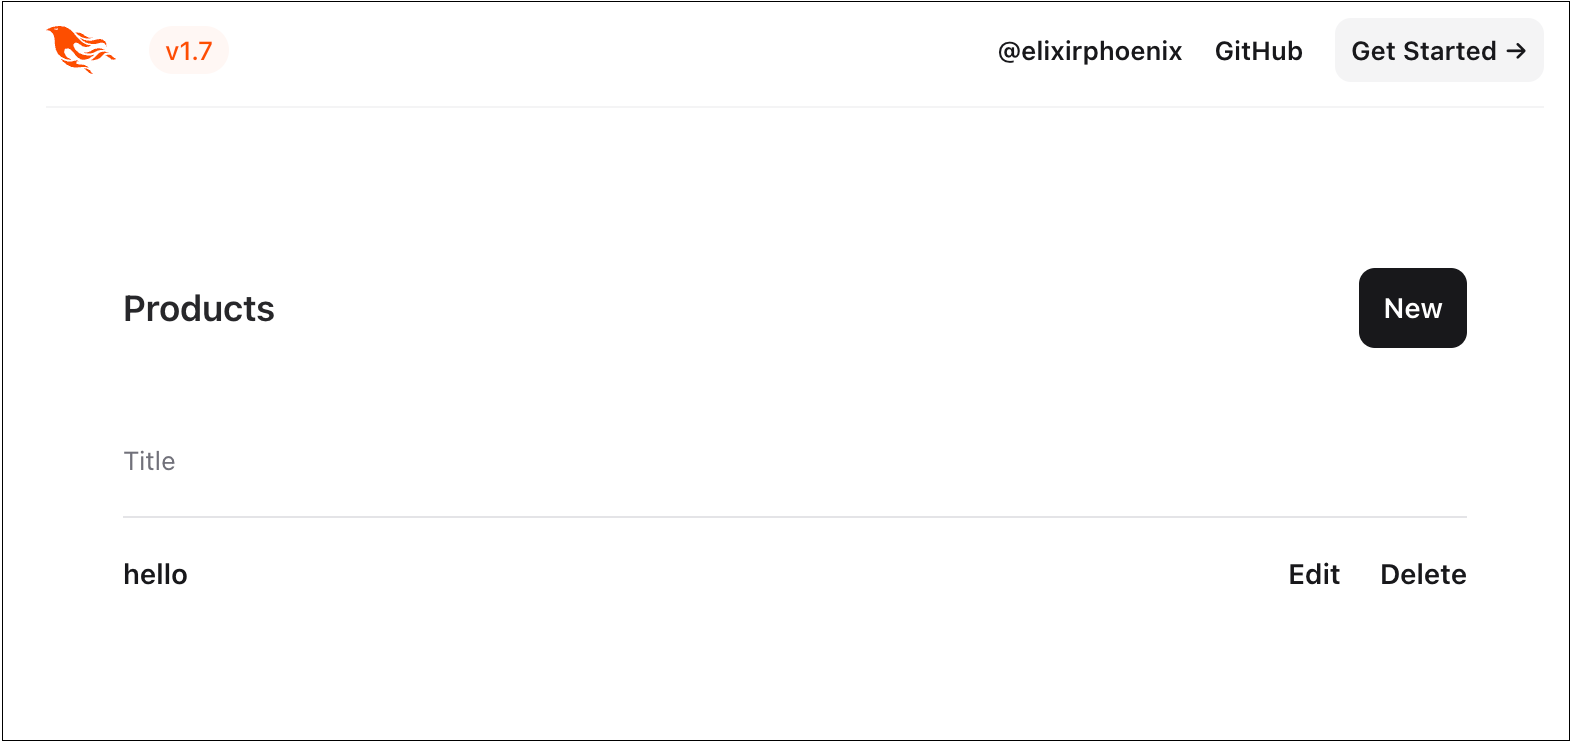
다시 브라우저를 재로딩하면 다음과 같이 'hello'가 추가된 화면을 볼 수 있다.
여기에 컬럼도 더 추가하고, 데이터도 하나 더 넣어보자. 데이터가 길어지면 index/2 함수가 지저분해지므로, 데이터는 모듈 속성으로 뺄 것이다. 데이터 모델은 Phoenix Contexts Guide의 이해의 것을 참고했다.
Product 구조체 보강
 defmodule Product do
-  defstruct [:id, :title]
+  defstruct [:id, :title, :description, :price, :views]
 end
데이터를 하나 더 추가하고, 모듈 속성으로 정의
defmodule HelloWeb.ProductController do
  use HelloWeb, :controller

  @product_list [
    %Product{ id: 1,
      title: "hello", description: "1st word of \"Hello World\".",
      price: 0, views: 0},
    %Product{ id: 2,
      title: "world", description: "2nd word of \"Hello World\".",
      price: 0, views: 0},
  ]

  ...
index/2 함수도 이에 맞춰서 수정한다.
   def index(conn, _params) do
-    render(conn, :index, products: [%Product{id: 1, title: "hello"}])
+    render(conn, :index, products: @product_list)
   end
index.html.heex에도 Product 구조체에 맞춰 컬럼을 추가하자.
 <.table id="products" rows={@products}>
   <:col :let={product} label="Title"><%= product.title %></:col>
+  <:col :let={product} label="Description"><%= product.description %></:col>
+  <:col :let={product} label="Price"><%= product.price %></:col>
+  <:col :let={product} label="# of Views"><%= product.views %></:col>
   <:action :let={product}>
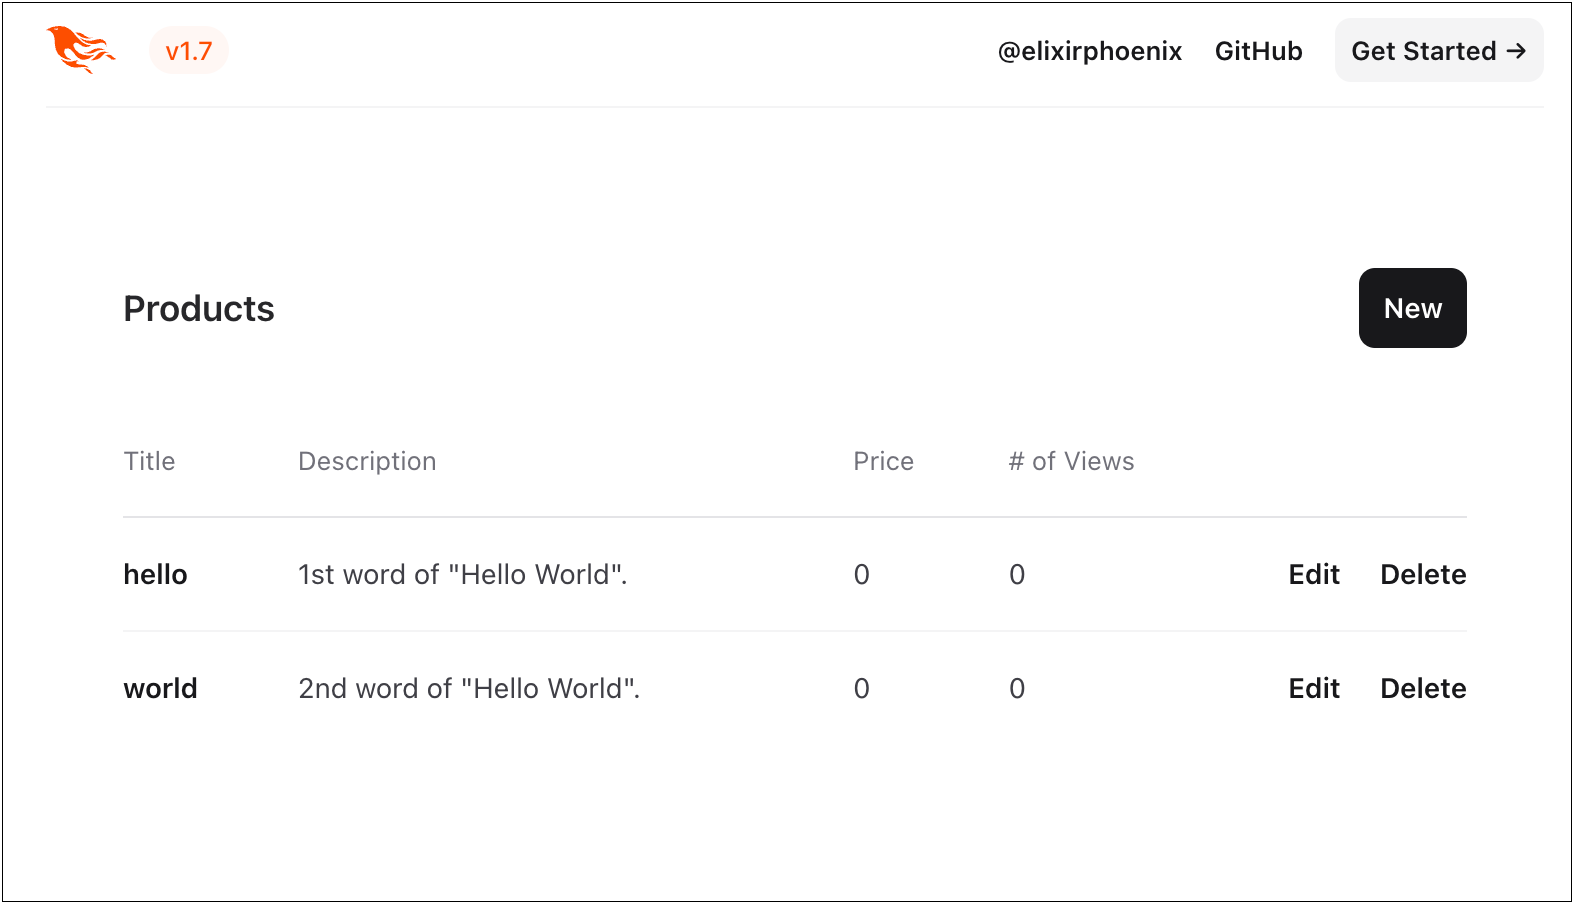
다시 브라우저 재로딩을 해본다. 추가한 데이터와 컬럼을 볼 수 있다.
controller와 html, heex의 뼈대를 추가하고 데이터를 추가해서 리스트 화면을 보는 것까지 해봤다. 하지만 아주 기초적인 내용에 해당하는 것이고, 각 아이템의 상세 정보를 보거나 수정하거나 삭제하거나 새로 추가하기 위한 코드는 작성이 되어 있지 않은 상태이다.
현재는 포스트의 내용에서 더 진도가 나가있긴 하지만, 추가나 수정 같이 form을 동반하는 UI는 Ecto와 changeset이 빠지니 난이도가 올라갔다. 이에 대한 내용도 정리되는 대로 별도 포스트로 올리도록 하겠다.