Phoenix Contexts Guide의 이해 #2

 ikpark
지난 포스트에 이어서 이번에는 장바구니 (cart) 기능을 추가한다. 지금까지는 Catalog 컨텍스트 안에서 스키마와 코드를 추가하고 편집했다면, 여기서는 새로운 컨텍스트를 추가하고 서로 다른 컨텍스트에 있는 스키마 사이에 연관 관계를 추가한다.
이번 포스트에서 작성할 모듈, 스키마 및 템플릿 파일과 관계는 다음과 같다. 특이하게도 controller와 html view를 generator로 직접 만들지 않고 수작업으로 만든다.

컨텍스트 추가
ShoppingCart 컨텍스트를 추가하고 Cart와 CartItem 스키마를 추가한다.
Cart스키마: 각 사용자에게 장바구니를 할당한다. 여기서 구체적으로 사용자 데이터 구조를 정의하는 것은 가이드 문서의 범위를 벗어나므로 여기서는 단순하게 UUID로 사용자 ID를 정의한다.CartItem스키마: 장바구니에 담기는 상품을 정의한다.cart_id로 어느 장바구니에 담기는 지를 나타낸다.
mix phx.gen.context로 실행했기 때문에 컨텍스트는 추가되지만 html 및 controller는 생성되지 않는다.
$ mix phx.gen.context ShoppingCart Cart carts user_uuid:uuid:unique
$ mix phx.gen.context ShoppingCart CartItem cart_items \
  cart_id:references:carts \
  product_id:references:products \
  price_when_carted:decimal \
  quantity:integer
마이그레이션을 실행하기 전에 DB에 적용할 스키마를 일부 수정한다. priv/repo/migrations/*_create_cart_items.ex 파일을 열어 다음 두 군데를 편집한다.
carts나 products 테이블의 아이템이 삭제되면 여기서도 같이 삭제되도록 설정한다.
       add :quantity, :integer
-      add :cart_id, references(:carts, on_delete: :nothing)
-      add :product_id, references(:products, on_delete: :nothing)
+      add :cart_id, references(:carts, on_delete: :delete_all)
+      add :product_id, references(:products, on_delete: :delete_all)

       timestamps()
     end
그리고 cart_id와 product_id FK를 같이 묶어 unique index로 설정한다.
     create index(:cart_items, [:cart_id])
     create index(:cart_items, [:product_id])
+    create unique_index(:cart_items, [:cart_id, :product_id])
그 후 마이그레이션을 실행한다.
$ mix ecto.migrate
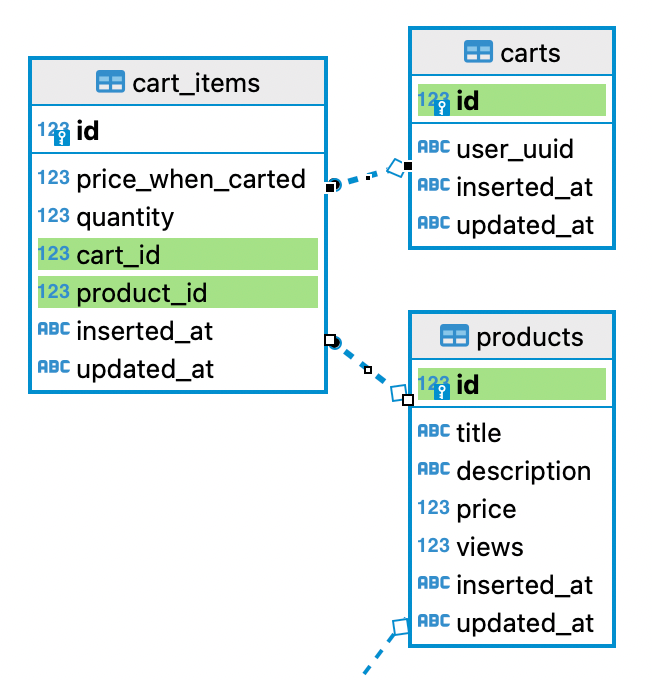
그 결과 새로 생성되는 carts, carts_items 테이블과 cart_id, product_id에 의한 테이블들의 연관관계는 다음과 같다.
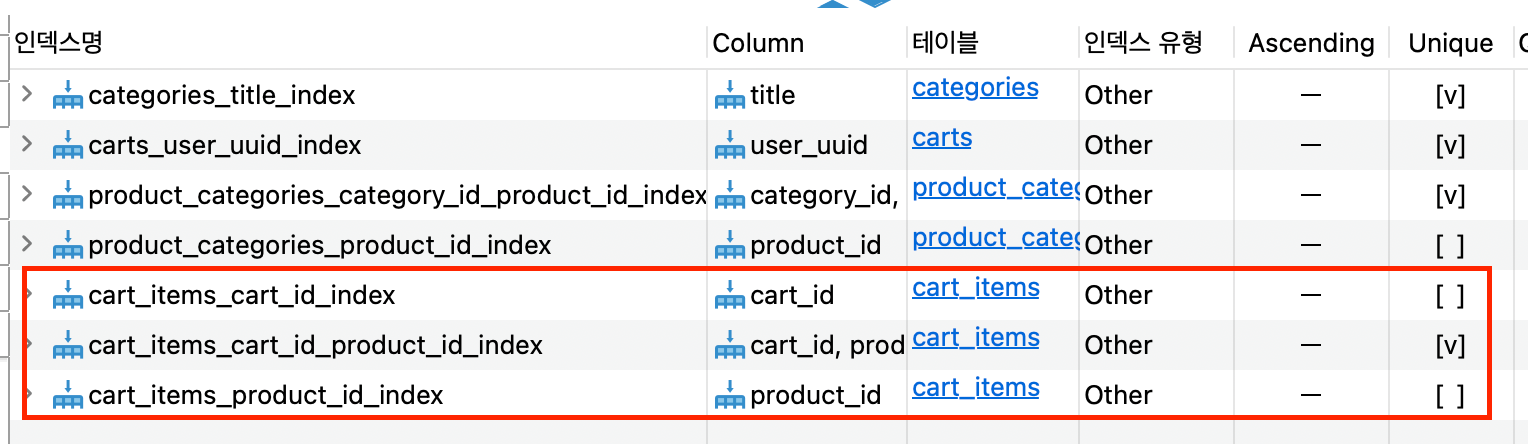
기본 인덱스 외에 create unique_index()에 의해 인덱스가 하나 더 추가된 것을 볼 수 있다.
데이터 연결
위에서는 마이그레이션 결과 FK를 이용해 DB 테이블 상에서의 연관관계를 만들었다. 이제 코드로도 연관관계에 따라 데이터를 연결한다.
cart 안에 여러 개의 CartItem이 포함될 수 있도록 1:n 연관관계를 추가한다. 먼저 lib/hello/shopping_cart/cart.ex 파일을 편집한다.
   schema "carts" do
     field :user_uuid, Ecto.UUID
+
+    has_many :items, Hello.ShoppingCart.CartItem
+
     timestamps()
lib/hello/shopping_cart/cart_item.ex 파일도 다음과 같이 수정하여 이름으로 나타내는 단순 FK를 구체적인 Cart, Product 스키마로 연결되는 FK로 바꾼다.
   schema "cart_items" do
     field :price_when_carted, :decimal
     field :quantity, :integer
-    field :cart_id, :id
-    field :product_id, :id
+    belongs_to :cart, Hello.ShoppingCart.Cart
+    belongs_to :product, Hello.Catalog.Product

     timestamps()
belongs_to로 CartItem에 두 개의 스키마를 연결했다.
Cart에has_many코드를 추가하여 n:1 관계를 명시Product에has_many나has_one둘 다 사용하지 않았다. 두 스키마 간에 명시적인 관계가 정의되어 있지 않거나 아니면 1:1인 경우에는has_*함수를 호출하지 않아도 된다거나 하는 이야기가 있을 법한데, 이에 대해서는 좀더 공부를 해야 할 것 같다.
사용자 세션 추가
장바구니는 사용자 별로 하나씩 할당되는데 사용자 정보는 앞서 설명했듯이 UUID로 나타낸다. 상품 하나 넣을 때마다 장바구니와 상품 화면을 왔다갔다 하면 UUID가 재생성되면서 매번 장바구니가 초기화되므로 최소한으로 세션 기능을 추가한다.
페이지 접근 시마다 사용자 세션을 확인하게 할 것이므로 router 안에서 pipeline을 통해 사용자 ID를 확인하고 사용자의 장바구니를 연결하는 기능을 추가한다.
lib/hello_web/router.ex의 pipeline에 다음을 추가한다.
   pipeline :browser do
     plug :accepts, ["html"]
     plug :fetch_session
     plug :fetch_live_flash
     plug :put_root_layout, {HelloWeb.Layouts, :root}
     plug :protect_from_forgery
     plug :put_secure_browser_headers
+    plug :fetch_current_user
+    plug :fetch_current_cart
  end
그리고 같은 파일에 fetch_current_user와 fetch_current_cart의 코드도 추가한다.
get_session/2는 Plug 패키지의 함수인데, :current_uuid 키에 대한 세션 값을 반환한다. 없으면 Ecto에서 새로운 UUID를 만들어서 사용한다.
fetch_current_cart 함수에서는 get_cart_by_user_uuid 함수에서 반환한 cart를 사용할 것이며, 없으면 create_cart 함수로 새로 장바구니를 만든다.
  defp fetch_current_user(conn, _) do
    if user_uuid = get_session(conn, :current_uuid) do
      assign(conn, :current_uuid, user_uuid)
    else
      new_uuid = Ecto.UUID.generate()

      conn
      |> assign(:current_uuid, new_uuid)
      |> put_session(:current_uuid, new_uuid)
    end
  end

  alias Hello.ShoppingCart

  def fetch_current_cart(conn, _opts) do
    if cart = ShoppingCart.get_cart_by_user_uuid(conn.assigns.current_uuid) do
      assign(conn, :cart, cart)
    else
      {:ok, new_cart} = ShoppingCart.create_cart(conn.assigns.current_uuid)
      assign(conn, :cart, new_cart)
    end
  end
이 함수들에서 호출되는 ShppingCart 컨텍스트 함수들을 수정하고 추가해보자. lib/hello/shopping_cart.ex 파일을 열어서 create_cart 함수를 사용자 uuid 앞으로 cart에 저장했던 상품들을 조회해서 다시 cart에 채우도록 수정한다. 그리고 새로 추가된 함수인 get_cart_by_user_uuid 함수를 작성한다.
   alias Hello.ShoppingCart.Cart
+  alias Hello.ShoppingCart.CartItem
-  def create_cart(attrs \\ %{}) do
-    %Cart{}
-    |> Cart.changeset(attrs)
+  def create_cart(user_uuid) do
+    %Cart{user_uuid: user_uuid}
+    |> Cart.changeset(%{})
     |> Repo.insert()
+    |> case do
+      {:ok, cart} -> {:ok, reload_cart(cart)}
+      {:error, changeset} -> {:error, changeset}
+    end
   end
+
+  defp reload_cart(%Cart{} = cart), do: get_cart_by_user_uuid(cart.user_uuid)
+
+  def get_cart_by_user_uuid(user_uuid) do
+    Repo.one(
+      from(c in Cart,
+        where: c.user_uuid == ^user_uuid,
+        left_join: i in assoc(c, :items),
+        left_join: p in assoc(i, :product),
+        order_by: [asc: i.inserted_at],
+        preload: [items: {i, product: p}]
+      )
+    )
+  end
컨트롤러 (직접) 추가
이제 Cart와 CartItem 관련 컨트롤러 및 view 템플릿을 추가한다. generator로 쉽게 만들 수 있지만 여기서는 직접 코드를 작성한다. 왜 이런 방법으로 하도록 설명하는지는 잘 이해가 안되지만 다양한 방법이 있다는 것을 보여주려 하는게 아닐까 추측한다.
먼저 lib/hello_web/router.ex router에 /cart_items, /cart에 대한 route를 추가한다.
    resources "/products", ProductController
+   resources "/cart_items", CartItemController, only: [:create, :delete]
+   get "/cart", CartController, :show
+   put "/cart", CartController, :update
  end
다음으로 CartItem용 컨트롤러를 추가한다. lib/hello_web/controllers/ 밑에 cart_item_controller.ex 파일을 새로 만들어 다음 내용을 작성한다.
defmodule HelloWeb.CartItemController do
  use HelloWeb, :controller

  alias Hello.ShoppingCart

  def create(conn, %{"product_id" => product_id}) do
    case ShoppingCart.add_item_to_cart(conn.assigns.cart, product_id) do
      {:ok, _item} ->
        conn
        |> put_flash(:info, "Item added to your cart")
        |> redirect(to: ~p"/cart")

      {:error, _changeset} ->
        conn
        |> put_flash(:error, "There was an error adding the item to your cart")
        |> redirect(to: ~p"/cart")
    end
  end

  def delete(conn, %{"id" => product_id}) do
    {:ok, _cart} = ShoppingCart.remove_item_from_cart(conn.assigns.cart, product_id)
    redirect(conn, to: ~p"/cart")
  end
end
이 컨트롤러에서는 ShoppingCart 모듈의 add_item_to_cart와 remove_item_from_cart 함수를 호출하지만 아직 만들지 않았다. lib/hello/shopping_cart.ex에 다음과 같이 수정한다.
+  alias Hello.Catalog
   alias Hello.ShoppingCart.Cart
제일 마지막에 아래 코드를 추가한다.
   def change_cart_item(%CartItem{} = cart_item, attrs \\ %{}) do
     CartItem.changeset(cart_item, attrs)
   end
+
+  def add_item_to_cart(%Cart{} = cart, product_id) do
+    product = Catalog.get_product!(product_id)
+
+    %CartItem{quantity: 1, price_when_carted: product.price}
+    |> CartItem.changeset(%{})
+    |> Ecto.Changeset.put_assoc(:cart, cart)
+    |> Ecto.Changeset.put_assoc(:product, product)
+    |> Repo.insert(
+      on_conflict: [inc: [quantity: 1]],
+      conflict_target: [:cart_id, :product_id]
+    )
+  end
+
+  def remove_item_from_cart(%Cart{} = cart, product_id) do
+    {1, _} =
+      Repo.delete_all(
+        from(i in CartItem,
+          where: i.cart_id == ^cart.id,
+          where: i.product_id == ^product_id
+        )
+      )
+
+    {:ok, reload_cart(cart)}
+  end
 end
CartItem을 위한 별도의 html 페이지는 만들지 않고, Product 페이지에서 Cart에 추가할 수 있는 버튼만 추가한다. lib/hello_web/controllers/product_html/show.html.heex 파일에 다음을 추가한다.
 </.list>
+
+<br />
+<.link href={~p"/cart_items?product_id=#{@product.id}"} method="post">Add to cart</.link>

 <.back navigate={~p"/products"}>Back to products</.back>
그 후 http://localhost:4000/products/1 페이지를 방문하면, 아래 그림처럼 화면 하단에 Add to cart라는 버튼 같지 않은 버튼이 추가된 것을 볼 수 있다.
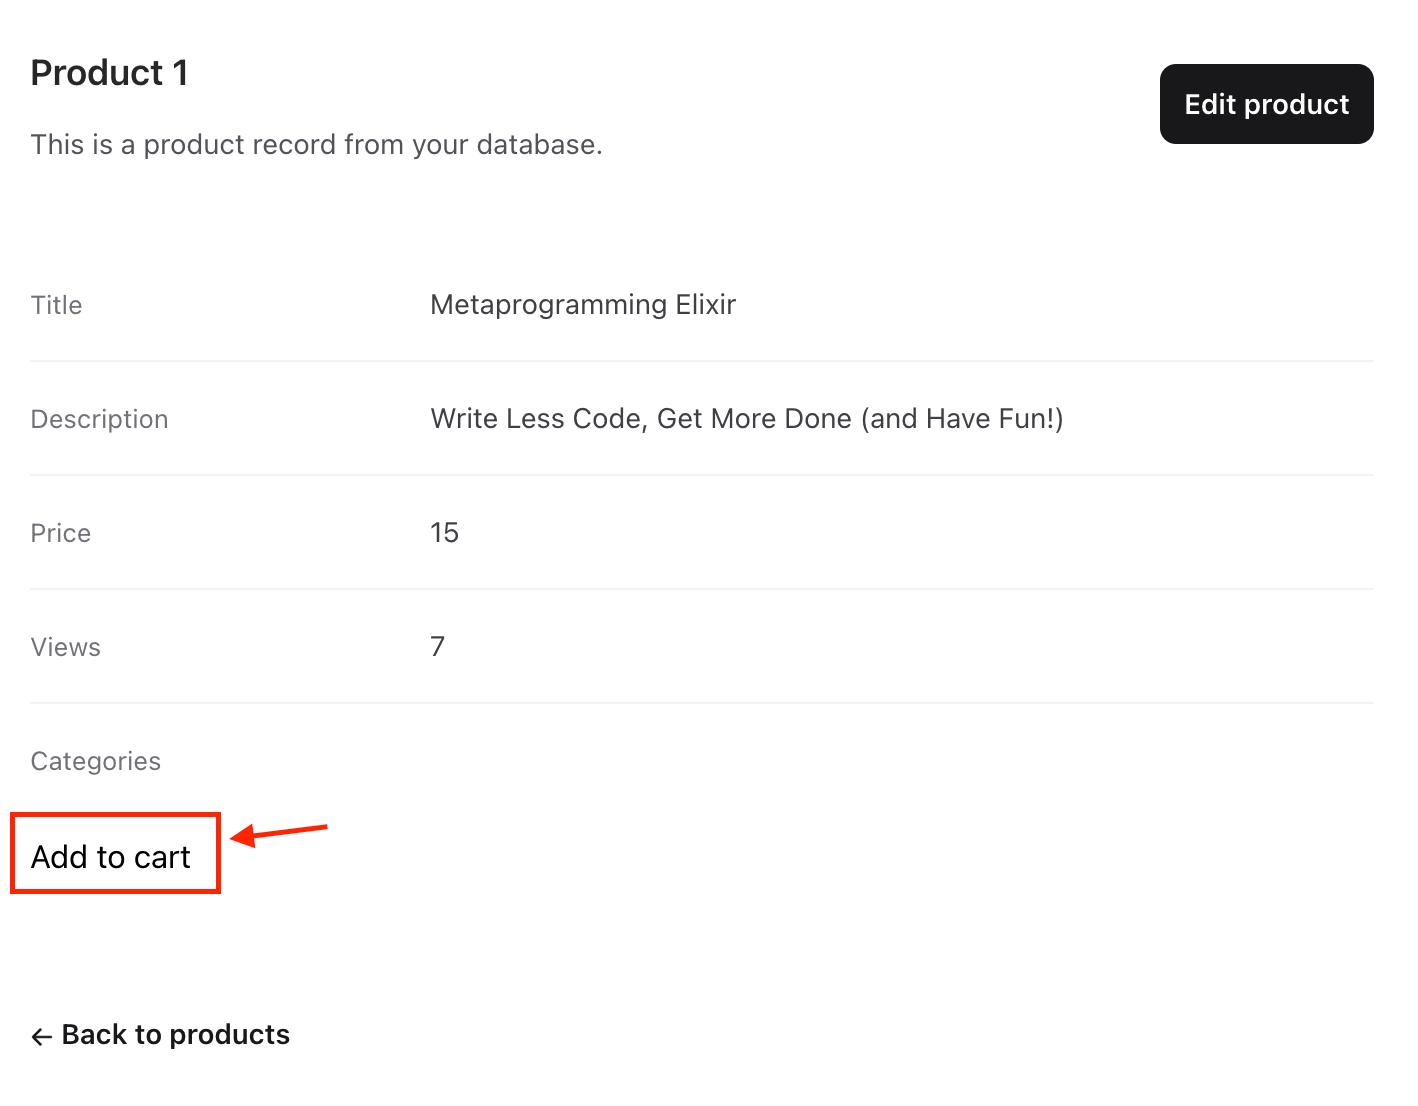
Add to cart 버튼 추가그 다음으로 Cart 관련 컨트롤러를 추가한다. 먼저 lib/hello_web/controllers/cart_controller.ex 파일을 만들고 다음 내용을 작성한다.
defmodule HelloWeb.CartController do
  use HelloWeb, :controller

  alias Hello.ShoppingCart

  def show(conn, _params) do
    render(conn, :show, changeset: ShoppingCart.change_cart(conn.assigns.cart))
  end
end
그리고 Cart 관련 html 템플릿들을 추가할 것인데, 먼저 lib/hello_web/controllers/cart_html.ex 파일을 만들고 다음 내용을 작성한다.
defmodule HelloWeb.CartHTML do
  use HelloWeb, :html

  alias Hello.ShoppingCart

  import Phoenix.HTML.Form

  embed_templates "cart_html/*"

  def currency_to_str(%Decimal{} = val), do: "$#{Decimal.round(val, 2)}"
end
이 파일에서는 lib/hello_web/controllers/cart_html/ 밑에 있는 템플릿 파일들을 불러들이므로 이 파일들을 만들어준다. 디렉토리를 만들고 그 밑에 show.html.heex 템플릿 파일을 추가한다.
$ mkdir lib/hello_web/controllers/cart_html/
$ vi lib/hello_web/controllers/cart_html/show.html.heex
<h1>My Cart</h1>

<%= if @cart.items == [] do %>
  Your cart is empty
<% else %>
  <.form :let={f} for={@changeset} action={~p"/cart"}>
    <ul>
      <%= for item_form <- inputs_for(f, :items), item = item_form.data do %>
        <li>
          <%= hidden_inputs_for(item_form) %>
          <%= item.product.title %>
          <%= number_input item_form, :quantity %>
          <%= currency_to_str(ShoppingCart.total_item_price(item)) %>
        </li>
      <% end %>
    </ul>

    <%= submit "update cart" %>
  </.form>

  <b>Total</b>: <%= currency_to_str(ShoppingCart.total_cart_price(@cart)) %>
<% end %>
이 템플릿에서 ShoppingCart 모듈의 total_cart_price와 total_item_price 함수를 사용하므로 다시 lib/hello/shopping_cart.ex 파일을 열어서 다음 코드를 추가한다.
+  def total_item_price(%CartItem{} = item) do
+    Decimal.mult(item.product.price, item.quantity)
+  end
+
+  def total_cart_price(%Cart{} = cart) do
+    Enum.reduce(cart.items, 0, fn item, acc ->
+      item
+      |> total_item_price()
+      |> Decimal.add(acc)
+    end)
+  end
 end
위에서 CartController에 create 메소드만 추가했었다. route.ex에서는 update도 정의했으므로 이제 lib/hello_web/controllers/cart_controller.ex에 update 메소드를 추가한다.
   def show(conn, _params) do
     render(conn, :show, changeset: ShoppingCart.change_cart(conn.assigns.cart))
   end
+
+  def update(conn, %{"cart" => cart_params}) do
+    case ShoppingCart.update_cart(conn.assigns.cart, cart_params) do
+      {:ok, _cart} ->
+        redirect(conn, to: ~p"/cart")
+
+      {:error, _changeset} ->
+        conn
+        |> put_flash(:error, "There was an error updating your cart")
+        |> redirect(to: ~p"/cart")
+    end
+  end
ShoppingCart 모듈의 update_cart 함수를 호출하고 있는데, 기본 생성된 함수를 우리 목적에 맞게 고쳐써야 한다.
   def update_cart(%Cart{} = cart, attrs) do
-    cart
-    |> Cart.changeset(attrs)
-    |> Repo.update()
+    changeset =
+      cart
+      |> Cart.changeset(attrs)
+      |> Ecto.Changeset.cast_assoc(:items, with: &CartItem.changeset/2)
+
+    Ecto.Multi.new()
+    |> Ecto.Multi.update(:cart, changeset)
+    |> Ecto.Multi.delete_all(:discarded_items, fn %{cart: cart} ->
+      from(i in CartItem, where: i.cart_id == ^cart.id and i.quantity == 0)
+    end)
+    |> Repo.transaction()
+    |> case do
+      {:ok, %{cart: cart}} -> {:ok, cart}
+      {:error, :cart, changeset, _changes_so_far} -> {:error, changeset}
+    end
  end
중간 마무리
본 포스트에서는 지난 포스트에 이어 장바구니 관련 스키마와 컨텍스트, 컨트롤러 및 html 템플릿을 추가했다. 특이한 점은, 컨트롤러 및 템플릿 파일을 generator 대신 직접 만든 것이었다. 오히려 일단 만들고 나서 삭제하거나 수정하는게 더 편할 것 같은데, 가이드 문서라서 직접 만드는 경우를 보여주기 위한 것인지, 다른 이유가 있는 것인지, 아니면 단순 작성자의 취향인 것인지 파악하기 어려웠다. 이제 다음 한 번 추가 포스트로 컨텍스트 가이드 문서에 대한 설명을 마무리지을 예정이다.